Showing posts with label Recipes. Show all posts

Tuesday, July 15, 2014

Grilled BLT salad


Has anyone started wondering if I still cook anymore? Ha, so it's just Lance that wonders if I still cook? At this stage of our life, less is more and repetition happens. We have standbys that will please everyone and things I know I can make that won't make me want to throw up once I smell the finished product (food smells are still bothersome). I really like summer and the minimally prepared seasonal foods that go with them. Lance tolerates salad reasonably well and Lucan, well, not so much. But in the case of this BLT salad, I was able to deconstruct it some where Lucan was eating "parts" of the salad along with us. And in the eyes of Dinner: A Love Story, that is a dinner win.

Salad
2 romaine lettuce hearts, cut in half lengthwise
2 tablespoons olive oil
1 cup cherry tomato halves
1 cup cooked largely diced bacon
1 cup seasoned croutons
1 medium avocado, skin and pit removed, and diced

Dressing:
1/3 cup mayonnaise (you could also sub plain greek yogurt too)
¼ cup milk
2 teaspoons apple cider vinegar or lemon juice
½ teaspoons garlic powder (the original recipe calls for 1 1/2 teaspoons of garlic and that was waay too much)
¼ teaspoon freshly ground pepper

Instructions

Heat the grill on medium high.
Brush the romaine lettuce with olive oil.
Place the romaine lettuce on the grill, cut side down for 3 minutes, then flip it to the other side and grill for 3 minutes (really watch your lettuce - if your grill runs hot, you don't want to burn your salad. Burnt lettuce is as about tasty as charred paper. I speak from experience.)
Plate the lettuce.
Top the grilled romaine lettuce with the tomatoes, bacon, croutons, and the avocado.
To make the dressing, whisk the mayonnaise, milk, vinegar, garlic powder, and pepper together until smooth.
Drizzle the dressing over the salad.
The best bites are the ones that include a little bit of everything on them. And of course, no burnt lettuce :) For inquiring minds, Lucan ate bacon, croutons and some avocado. That's kind of a balanced meal, right?
 

Tuesday, August 6, 2013

Homemade Taco Seasoning: One Huge Batch


I have a bad habit of doubling recipes and doing the math wrong. Most of the time this happens when I'm on the phone talking to someone or I'm distracted by the little man pulling on my leg to "see, see!" Lucan routinely wants to get a glimpse of what's going on and is interested in what he might be having for supper. I had wanted to make homemade taco seasoning for quite sometime, but had been waiting until our large container had finally run out to replace it. In true Kara fashion, I only wanted to go through the hassle of dragging everything out and measuring once - so let's double the recipe! I had mathematician Lance help me out and had him convert the recipe from teaspoons to tablespoons and from tablespoons to cups. If there's anything I am worse at than converting recipes, it's keeping track of whether I did 4 tablespoons or 5 of salt. 

I am really enjoying my homemade taco seasoning for several reasons: 
1. I can control what goes into my seasoning and tailor it to my preferences. Do you like yours milder? Cut back on the chili powder. Do you want a little more burn? Add more red pepper flakes.
2. It's cheaper. A LOT cheaper. An individual packet of taco seasoning is usually around $1. A giant canister is priced around $10 at Costco. Making my own? Around $4 after I bought my spices at Aldis. 
3. It's a little bit zippy-ier than most taco seasonings, which suits me just fine.
4. Hello - no preservatives! 
5. Watching your sodium intake? Reduce the amount of salt in the recipe. 

Without further adieu, my gigantic batch of taco seasoning recipe!

Homemade Taco Seasoning
1 cup and 1/4 cup chili powder
1/2 cup and 2 tablespoons cumin
1/2 cup salt
1/2 cup fine ground pepper
1 tablespoon and 2 teaspoons garlic powder
1 tablespoon and 2 teaspoons onion powder
1 tablespoon and 2 teaspoons red pepper flakes
1 tablespoon and 2 teaspoons oregano
1 tablespoon and 2 teaspoons paprika

Mix well to combine and store in an air tight container. My old taco seasoning canister held my giant recipe perfectly and now I won't have to make taco seasoning for a couple of years. Double win - money saved and time saved!

To use: Over medium heat, brown 1 lb. of ground beef and drain. Add 2 tablespoons of seasoning mix and ¾ cup water to the ground beef. Simmer, stirring frequently, until the sauce thickens and coats the beef, and there is not much liquid left.

Friday, June 14, 2013

Homemade Granola - an ode to Erika


This is my friend, Erika's recipe. She was my first "real" friend when we moved here to Des Moines. Then she up and broke my heart and moved away, four years into our friendship. We've always operated on the same wavelength and Erika got me involved in the going-on's at church and always had an open door. We worked together and had kiddy-korner cubes at the same office, were in the same small group and she was the lady I went to when I had mommy questions. You can only imagine my complete dismay when they announced they were moving 7 months into my pregnancy. How in the world was I going to be able to take care of a little BOY? Then when we had Lucan and were still in the hospital, Erika came to visit me TWICE and called me everyday for two weeks when we went home. She was and is a blessing still today. Even living wayyy too far away now. But this is her recipe and I always smile and think of her when I make it.

One of our more glamorous pictures at the Iowa State Fair

 
One of my favorite summer breakfasts is greek yogurt parfaits with homemade granola and fresh fruit. Sliced bananas, strawberries and blueberries when they are in season are perfect in parfaits. The greek yogurt keeps you full with all the protein and I love the crunchy, slightly salty taste the granola adds too. I’ll make a big batch of granola to keep on hand and then use it to grab and go as I’m running out the door in the morning. Lance loves to snack on it plain in the afternoon as a pick-me-up.

4 cups old-fashioned oats (NOT quick oats!)
1 ½cup sliced almonds
½ cup packed light brown sugar
¼ cup canola oil
¼ cup honey
1 tsp vanilla
½ tsp salt
½ tsp cinnamon
1 ½ c. dried fruit

In a large bowl, mix the oats, almonds, cinnamon and brown sugar. Set aside. In a small bowl, lightly heat oil and honey in the microwave, maybe around 30 seconds. Stir in vanilla. Pour liquid over the oats and almonds, and mix until evenly-coated.

Spread oat mixture on cookie sheet, and place in the oven. Heat oven to 325 degrees and bake for 40 minutes, stirring every 10 minutes. (Funny story: for the longest time I had it in my mind that this needed to bake at 350 degrees, which would inevitably burn the granola. I did this three times until I finally highlighted in the recipe 325 degrees!) Remove from cookie sheet to cool and add dried fruit or dried coconut after everything has cooled. Store in a covered container and enjoy.

Variations: you can add any combination of dried fruit. In the past I’ve stirred in cranberries, cherries, cut up apricots and raisins. If you are feeling especially adventurous, add a few mini-chocolate chips too.

There are lots of great granola recipes, but I love the simplicity of this one. I especially love the price tag of homemade granola because it is so much less expensive than buying it at the grocery store. I especially love Big Sky Bakery’s granola (you can find it at many Hy-Vees and typically they’re at the Valley Junction Farmer’s Market and the Downtown Farmer’s Market) but I do not love the hefty price tag for a bag of their granola. This granola is so much cheaper and you have control of what exactly you put in. That’s what I love about making things – knowing what the ingredients are to the foods that you put into your body! 


Friday, August 24, 2012

Santa Fe Summer BBQ Pizza


One side benefit from not having a job is being able to spend more time cooking and using our garden produce. Yes, it's a very small benefit, but we're looking on the bright side here folks. Under normal circumstances I wouldn't be able to start pizza dough in my bread machine on a weeknight. Now, with a little planning and foresight, I can do this fairly easy. I need to look into making pizza dough ahead of time and then freezing it. Does anyone know anything about doing that?

The main reason I made this particular pizza was because we happened to have all of the ingredients on hand and fresh. Fresh cherry tomatoes, cilantro and sweet corn. I even happened to have some black beans in the fridge begging to get used. I've taken to buying dried beans, soaking them overnight and the cooking them on low in the crockpot during the day. It's the cheaper option and I throw them in the freezer (never to be seen again) and pull them out as needed. This was also a good supper option because it includes no meat. Meat is pricey. Our stockpile of beef has dwindled and there isn't any magic money lying about to buy another side of beef. So, meatless Tuesdays it is. Lance has even stopped complaining about the meatless meals we have because it typically uses up a healthy pile of garden tomatoes.

Enough tangent. This pizza wasn't bad. Most people would probably be like this pizza as long as you like subbing bbq sauce for your typical tomato sauce. I'm not sure if I'm part of that group. But again, we had every single ingredient on hand, so it was hard to argue against making this pizza. I'd probably make it again too, but not terribly often.

Without further adieu, the recipe.

Topping ingredients
 
1/3 cup BBQ sauce
1 cup black beans, drained & rinsed
1 cup corn kernels
1 cup halved cherry tomatoes
1 cup mozzarella cheese
1/4 cup chopped cilantro

Pizza crust ingredients

3/4 cup water, 80 degrees
1 T oil
1 T sugar
1/2 t salt
1 T dry milk
2 1/4 cups bread flour
3/4 t Red Star Quick Rise Yeast

With my bread machine you add all the ingredients in the order they are stated and then hit the program for dough. It takes an hour and 20 minutes. Then you pull out your dough, flour it lightly and then press into a pizza pan, top with desired ingredients and then bake at 425 degrees for 20 minutes.

Another great meatless Tuesday!

Monday, May 28, 2012

Rhubarb-Lemon Coffee Cake Recipe


I'm not keen on rhubarb. In fact I think that rhubarb is weird. It's a fruit, yet there's no physical "fruit"
that is produced. You eat the stalk. It's really bitter. It's kind of stringy. Yes, I can safely say that rhubarb is weird. This is the first rhubarb item I've ever made. I knew so little about this plant, that I had to call my mom to ask her how to harvest the darn stuff or even to know what to pick. (side note: I robbed this from our neighbor's yard at 9 pm with a flashlight in hand. Lance called me a creeper.) Now my mom thinks that I've turned over a new leaf (pun intended!) and has offered me her rhubarb cobbler recipe. I'm not sure that I'm ready for that- baby steps mom!

I will be honest and admit that sometimes I still have issues trying something that I think that I don't like. Such is the case with this coffee cake. My friend Noelle made this coffee cake one time for Sunday school. Lance had offered to get me some and I tried it without knowing there was rhubarb in it. It's a good thing that I made this mistake because I now know that not all rhubarb should be abhorred :) This coffee cake is especially tasty. It has a slight zing to it, which can be attributed to both the lemon and the rhubarb. But the zippyness is tempered by the crumb topping and glaze. My general rule of thumb is that coffee cake shouldn't have both a crumb topping and a glaze. Too much sugar and too many extra steps in my opinion. But since I had already had it with both, I knew that both items were inherent to the success of the cake.

So, if you have reservations about rhubarb, this is a good place to start. And if you already like rhubarb, you should try this recipe!


Ingredients


2-1/4 cups all-purpose flour
3/4 cup sugar
1/2 teaspoon baking powder
1/2 teaspoon baking soda
1/4 teaspoon salt
1/3 cup butter, melted
2/3 cup vanilla yogurt
2 eggs
1 tablespoon lemon juice
2 teaspoons grated lemon peel
1 cup chopped fresh or frozen rhubarb
1 teaspoon ground cinnamon
1/2 teaspoon ground nutmeg

STREUSEL:
1/2 cup all-purpose flour
1/3 cup sugar
1 teaspoon ground cinnamon
2 tablespoons cold butter

GLAZE:
1/3 cup confectioners' sugar
2 teaspoons lemon juice

Directions

In a large bowl, combine the flour, sugar, baking powder, baking soda and salt. In a small bowl, whisk the butter, yogurt, eggs, lemon juice and lemon peel. Stir into dry ingredients just until moistened.

Coat a 9-in. springform pan with cooking spray and sprinkle with flour. Spread half the batter into prepared pan. Add rhubarb to within 1/2 in. of the edges. Sprinkle with cinnamon and nutmeg. Top with remaining batter.

For streusel, combine the flour, sugar and cinnamon in a small bowl; cut in butter until crumbly. Sprinkle over batter. Bake at 350° for 35-45 minutes or until a toothpick inserted near the center comes out clean. Cool for 10 minutes.

For glaze, in a small bowl combine confectioners' sugar and lemon juice. Drizzle over warm cake. Cool for 1 hour.

Monday, February 13, 2012

Buffalo Chicken Mac & Cheese


Me oh my, this was good. Really, really, really good. Probably even worth the $6+ of cheese. And the fight in the Fareway parking lot that is referenced in this post.

My friend Mandy once asked me for a recipe for mac & cheese. I had to admit that I didn't have one. I felt a little lame. What kind of food/lifestyle blogger/complainer doesn't have a recipe for mac & cheese? This one. It's probably because making mac & cheese out of a box is so dang easy. This recipe is worth the effort. It's so good. I'm a little hungry just thinking about it. Nicole - you could make it vegetarian by omitting the chicken.

Buffalo Chicken Mac & Cheese
7 tablespoons unsalted butter
1 pound (16 oz) elbow macaroni
1 small onion, finely chopped
2 stalks celery, finely chopped
2 cups shredded rotisserie chicken
2 cloves garlic, minced
3/4 cup hot sauce
2 tablespoons flour
2 teaspoons dry mustard
2 1/2 cups half-and-half
1 pound (16 oz) yellow sharp cheddar cheese, cut into 1-inch cubes (about 3 1/2 cups)
8 ounces pepper jack cheese, shredded (about 2 cups)
2/3 cup sour cream
1 cup panko breadcrumbs
1/2 cup crumbled blue cheese
2 tablespoons chopped fresh parsley (I omitted - way too expensive during the winter in Iowa)

Preheat the oven to 350 degrees and spray a 9-by-13-inch baking dish with cooking spray. Bring a large pot of salted water to a boil; add the pasta and cook until al dente, about 7 minutes. Drain.

Meanwhile, melt 3 tablespoons butter in a large skillet over medium heat. Add the onion and celery and cook until soft, about 5 minutes. Stir in the chicken and garlic and cook 2 minutes. Then add 1/2 cup hot sauce and simmer until slightly thickened, about 1 more minute.

Melt 2 tablespoons butter in a separate saucepan over medium heat. Stir in the flour and mustard until smooth. Whisk in the half-and-half and add the remaining 1/4 cup hot sauce and stir until thick, about 2 minutes. Whisk in the cheddar and pepper jack cheeses, then whisk in the sour cream until smooth.

Combine the chicken mixture, cooked pasta, and cheese sauce and toss to combine.

Put the remaining 2 tablespoons butter in a medium microwave-safe bowl and microwave until melted. Stir in the panko, blue cheese and parsley. Sprinkle over the macaroni and bake until bubbly, 30 to 40 minutes. Let rest 10 minutes before serving.

Best served immediately. Makes around 8 servings.

This recipe was obtained from The Girl Who Ate Everything. She adapted it from a recipe from the Food Network.

Saturday, January 28, 2012

Pizza Braids

Pizza braids are one of my go-to recipes for when I bring a meal to a family. Generally they are well received because they involve warm bread and pizza flavors. I like them because they are a bit different than the standard casserole or pasta dish and pretty easy to assemble. The hardest part is planning well enough in advance to let your bread dough rise.

Here are your ingredients: a loaf of frozen bread dough, your choice of spaghetti or pizza sauce, Mozzarella & Parmesan cheese and whatever pizza toppings you fancy. When I'm making them for a family who I don't know their toppings preference, I usually go pretty standard like pepperoni.

The first thing to do is to follow the standard instructions for thawing and letting the frozen bread dough rise. You'll need to grab a loaf pan, spray it with cooking spray, set the bread dough in the pan, cover the pan with cling wrap that has also been sprayed and place it in a warm place to rise for a few hours. Once the dough has doubled in size, it's time for action!

Sprinkle flour on your counter, rolling pin, and dough ball. Roll out the dough into a rectangle. This will take a little elbow grease, but you'll be fine (less of a workout than playing airplane with my 20 lb baby!).

Spread your sauce down the middle, not going all the way the ends. You will want to leave 2.5 inch space all the way around so you can cut strips. Follow with your pizza toppings, then the cheese. Sometimes I'll sprinkle on a little pizza seasoning too. Don't get crazy with toppings otherwise they'll leak out the sides.

Next is the cutting of the braid strips. Easy! Cut approximately 10-12 strips total on each side, around 1 inch apart. Cut pretty close to the toppings, but not too close otherwise you'll have leakage. You can leave wider strips on the ends.

Your finished product should look something like this.


Now for the braiding. Don't be afraid, it's really easy! All you have to do is start on one end, folding your end piece in. Now taking a strip from the left side, stretch it across the toppings to reach the other side. Repeat on the other side until you almost reach the base. Leave 2 or 3 strips on both sides because you need to fold the end piece up and then braid/cover with the remaining strips.


When you are done it will look like an papoose all wrapped up. Get a friend to help transfer to a baking sheet. It can be a little tricky ...
 

Easy peasy, lemon breezy. Bake at 375 degrees for ~20 minutes. Add an additional 10-15 minutes if baking frozen.

Tuesday, November 29, 2011

Spoon Cornbread


Happy post-Thanksgiving friends! Did everyone get their bellies full? My family lives about 40 minutes south of Lance's family, so we have the pleasure of doing two Thanksgiving meals on Thanksgiving. Which typically makes me feel like I'm going to puke. It's no one's fault but my own, so I can't really moan and groan about it.
Every year I bring something different to each of our family's respective Thanksgiving celebrations. The trick with Lance's family is that there are some picky eaters. Namely, Lance's dad. He is the pickiest eater I've ever met. More picky than my friend Erika's husband, Ryan. Lance's dad doesn't even like cheesy potatoes! He announced during the meal that the reason America is fat is because of cheesy potatoes ... Moving on. In the past I've brought a few things that have been more on the "wild" side (hot pepper jelly chesse dip, sweet potato casserole, cheesecake with raspberry sauce) and my FIL has refused to try them. Then I thought that I would make something less "wild" like pecan pie bars and still he wouldn't try them. This year I made a classic spoon cornbread and to no avail, my FIL still wouldn't try it. Even though it's delicious, not at all threatening and contains a key ingredient from his list of "acceptable" vegetables. Whatever. Everyone else really liked it and had several requests for the recipe. I guess I'll just have to try harder at Christmas!

But spoon cornbread is yummy and is a great addition to any holiday meal or to a chili feed. Take my word for it. Not my FIL's.

Ingredients
1 box Jiffy cornbread mix
2 eggs, beaten
1/2 can of corn, drained
1/2 can of creamed corn
2 sticks of butter, melted (this is not a health recipe!)
1 cup of sour cream & chives dip
Cheese

Combine all ingredients, except cheese. Pour into sprayed 9x9 square pan. Bake at 350 degrees for 45 minutes. Remove pan, sprinkle on cheese and bake for another 10 minutes or so, until golden brown. Enjoy!

Wednesday, June 1, 2011

Strawberry Trifle


A few years back I decided I needed a trifle bowl. Really, no one needs a trifle bowl. But I enjoy it and the few times I use it a year makes me happy. Trifles are one of my favorite spring desserts to make. Typically fruit is in season, readily available, and not crazy expensive. Trifle desserts present themselves very well. They are always very pretty with layers of fruit, pudding, and cake.

The type of trifle I made here is what I call a cheater dessert. I have a few of those up my sleeve. It's a cheater dessert because I didn't actually have to bake anything with it - all I did was assemble it. I prepped the fruit, the angel food cake and the pudding the night before and then assembled it about an hour prior to serving it. Definitely a cheater dessert :)

Ingredients
1 small package instant vanilla pudding mix (I used cheesecake pudding instead)
2 cups cold milk
1 (9 inch) angel food cake, torn into cubes
2 bananas, sliced
Fresh strawberries, sliced
Fresh blueberries
1 (12 ounce) container frozen whipped topping, thawed


Directions
Prepare pudding with milk according to package directions. Gently fold in whipped topping. Refrigerate until set.

In a trifle bowl or other glass serving dish, layer the cake pieces, the pudding mixture, and the fruit. Repeat layers. Cover and chill before serving.

Wednesday, April 27, 2011

Homemade lemon bars

Do you know that I've never made lemon bars not out of a box mix before? I know, a little shameful. Not as shameful as ... being a bandwagon Iowa fan or something else equally ridiculous :)


I knew I needed to make these lemon bars after a stunning write-up in the USA Weekend a few Sundays ago. I knew they would be a fun spring addition to our Swap Party munchies. They were everything a lemon bar should be - sweet, tart, a little tangy with a rich buttery shortbread crust. I've previously enjoyed Krusteaz Lemon Bars Mixes, but of course the homemade version far surpasses the box mix. If you are feeling the itch for lemon bars - this is your recipe. It wasn't too hard either, Lance and I assembled these at 9:30 pm with little difficulty. However, I did have a moment of panic when I didn't think the lemon filling was setting up properly because I failed to measure out the lemon juice when I was juicing the lemons. But all's well that ends well and the bars were perfection! One thing to keep in mind - this does not make a huge recipe.

Recipe by Three Many Cooks

For crust:
1 cup all-purpose flour
1/8 tsp salt
½ cup confectioner's sugar
1 stick (8 Tbs.) butter, melted but not hot

For filling:
2 large eggs
¾ cup sugar
1½ Tbs. all-purpose flour
6 Tbs. juice from 2 lemons
2 tsps. finely grated lemon zest

Adjust oven rack to lower-middle position and heat oven to 325 degrees. Spray an 8- by 8-inch baking pan with vegetable cooking spray. Fit an 8-inch by 16-inch piece of heavy-duty foil across pan bottom and up the 2 sides as foil overhangs to pull bars from the pan. Spray foil with vegetable cooking spray.
Mix flour, salt, confectioner's sugar in a medium bowl; stir in butter to form dough. Press dough into pan bottom (the bottom of a measuring cup dipped in flour helps). Bake until pale golden, about 20 minutes.
While pastry bakes, whisk eggs, sugar, flour, lemon juice and zest in a medium bowl.
Remove pan from oven. Add lemon mixture and continue to bake until just set, about 20 minutes longer; let cool in pan for a few minutes and then using foil handles, pull bars from pan and set on a wire rack. Cool until room temperature. Cut into squares and serve.

Wednesday, April 6, 2011

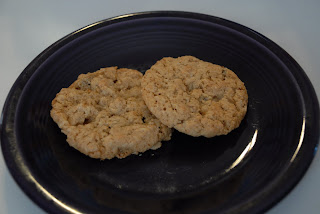
I make the best oatmeal raisin cookies on the face of the earth.


Yes, it might be boisterious of me to say that I make the best oatmeal raisin cookies, but gosh golly, it's true. I really do make the best oatmeal raisin cookies on the face of the earth. I don't make them often because in the words of Phobe Buffay from the acclaimed comedy Friends "it's not fair to the other cookies." Please disregard the fact that according to this picture, it looks like there are zero raisins in the actual cookies ...

The thing that makes these particular cookies so special is their texture. An oatmeal cookie should not be overly crunchy, nor should be it overly soft and doughy. No pillow cookies here. An oatmeal cookie needs slightly crunchy, but not break your teeth crunchy. These cookies are perfect. They are the perfect Martha Stewart cookies (they really are Martha cookies - they are her recipe!) Like many Martha recipes, there is a fussy and long list of ingredients. No cheating, every single ingredient on this list is important. Lance and my dad adore these Oatmeal Raisin cookies. They will both attest to the lovliness of them.

Without further ado, here's the recipe to Martha Stewart's perfect Oatmeal Raisin Cookies

Ingredients

3 cups old-fashioned rolled oats

1 cup all-purpose flour

2 tablespoons all-purpose flour

1/2 cup toasted wheat germ

1 teaspoon baking soda 1 teaspoon baking powder

1/2 teaspoon ground cinnamon

1/2 teaspoon coarse salt

1 cup (2 sticks) unsalted butter, softened

1 cup granulated sugar

1 cup packed light-brown sugar

2 large eggs

1 teaspoon pure vanilla extract

1 1/2 cups raisins


Directions

1.Preheat oven to 350 degrees. Stir together oats, flour, wheat germ, baking soda, baking powder, cinnamon, and salt in a large bowl; set aside. Put butter and sugars in the bowl of an electric mixer fitted with the paddle attachment. Mix on medium speed until pale and fluffy, about 5 minutes. Mix in eggs and vanilla. Reduce speed to low. Add oat mixture; mix until just combined. Mix in raisins.

2.Using a 1 1/2-inch ice cream scoop, drop dough onto baking sheets lined with parchment paper, spacing 2 inches apart. Flatten slightly.

3.Bake until golden and just set, about 14 minutes. Let cool on sheets on wire racks 5 minutes. Transfer cookies to racks using a spatula; let cool completely. Cookies can be stored in airtight containers at room temperature up to 3 days

Friday, November 12, 2010

Baked Potato Soup


Mmm... nothing says comfort food like baked potato soup. Especially with fresh bread. This baked potato soup was different from my normal baked potato soup. Typically I make a Betty Crocker version that starts off with a chicken broth base - no roux. And it's good, but it's not thick or creamy. If you are looking for a potato soup version that is rich and hearty - this is your recipe. A couple of additional thoughts - you can save yourself time by doing your baked potatoes ahead of time or by using leftover baked potato innards. Also, we did not have any bacon at the time and I do think that potato soup needs bacon. Then again, I'm a firm believer in most things bacon. Therefore, I could be a little biased :)

Baked Potato Soup Ingredients
4 large baking potatoes
2/3 cup butter
2/3 cup flour
6 cups milk
3/4 teaspoon salt
freshly ground pepper to taste
4 green onions, chopped
12 slices bacon, crisp-fried and crumbled
1 1/4 cups shredded cheddar cheese
1 cup sour cream

Directions
Bake potatoes until tender; cool. Scoop out pulp into a small bowl.
Melt butter in a heavy saucepan over low heat; stir in flour. Cook for 1 minute, stirring constantly. Add the milk gradually. Cook over medium heat until thickened and bubbly, stirring regularly. Season with salt and pepper.
Add the potato pulp, 2 tablespoons green onions, 1/2 cup of the bacon, and 1 cup of the cheese. Cook till heated through.
Stir in sour cream (do not boil after this point otherwise soup will separate and generally be gross). Sprinkle each serving with reserved green onions, bacon, and cheese.

Thursday, October 7, 2010

Salted Nut Roll Bars


These are delicious. And an occasion where more marshmallow does not equal more gooey goodness. Who would have thought. I've always been under the assumption that more marshmallows is ALWAYS a good thing! But if you add, I don't know, 3x the amount you are supposed to, the marshmallow just gets everywhere and on everything. It's not good. So take my proven advice, and don't triple the marshmallows :)

Salted Peanut Chews

Base:
1 Yellow Cake mix
1/3 cup margarine
1 egg

3 cups miniature marshmallows

Topping:
2/3 cup white corn syrup
1/4 cup margarine
2 tsp. vanilla
12 oz. bag peanut butter chips
2 cups rice krispies
2 cups salted peanuts (no skins)

Heat oven to 350 degrees. In large bowl, combine all base ingredients until crumbly. Press in bottom of ungreased 9 x 13 pan. Bake 12-18 min.
Remove from oven, sprinkle on marshmallows and bake 2-3 min., until marshmallows start to puff. Remove from oven.
In large saucepan, heat corn syrup, marg., vanilla, and chips until melted and smooth.
Remove from heat and stir in cereal and peanuts.
Spread over marshmallows.
Chill. Store covered.

Tuesday, October 5, 2010

Homemade Larabars

I've been blog slacking. Blog slacking can be attributed to two things: 1) tiredness 2) extreme hunger. Meaning, I'm so hungry by the time I make supper I eat it before I remember to snap a picture. I did this the other night with the Eggplant Parmesan. It was fantastic. And I was starving and gobbled it right up. Hence, no picture. But I'll still post the recipe.

But here is my adventures in Lara Bars. I "inconvenienced" Sarah's food processor while making these (I say "inconvenience" because it used to have a pulse option and an off option. Now it has no options - just a go speed.) And Lance tried to fix it (Sarah I don't think I told you that ...). But Lance didn't fix it. In fact he made me so nervous that he was going to break it more that I ended up shouting at him to stop. I didn't want to have to purchase a new $100 food processor for their family. Lance's comment "well ... I didn't know they cost so much. Sorry ..." Moral of the story: Lance can sometimes fix things. And sometimes he breaks things further. I had to stop him before we reached that point.

Larabars are a nice on-the-go snack. But good gracious, are they expensive! At $2/bar, they were a luxury item. Precious Sarah purchased some bulk dates for me at $5 and then I purchased some lightly salted peanuts and orange cranberries. Overall, my version is much much cheaper. And they aren't hard to make. Unless you break the food processor you borrowed :)

Larabar ingredients for PB Jelly Larabars
22 dates
1/3 cup of peanuts
1/3 cup cranberries or other dried fruit


Pulse everything, starting with the dates, in the food processor. Amounts are more or less, based on your texture preference.


From the moisture of the dates everything will start clumping together nicely.


Spread a couple of tablespoons out onto a piece of plastic wrap and mush it into a bar shape.


Then wrap tightly and store in the refrigerator for freshness.

Enjoy as a healthy, fiber-filled snack. Kids and adults will all enjoy!

Thursday, September 16, 2010

Signature Dish


Do you have a signature dish? No? Isn't it normal for every 27 year-old to have a signature dish? :) Anywho, my signature dish is a Pineapple Apricot Pie. I made this as a high schooler for 4-H and took it both as a project and for our county pie auction. According to my MIL this is a n0-no. Opps... I have made this pie for family occasions and I made this for Thanksgiving as an RA too. It's a winner, either as a double crust pie or as a single crust pie with a crumble topping. Usually I make the crumble topping when I've completely botched the second layer of pie crust. Like all pies, this pie is perfect warmed and served with a scoop of vanilla ice cream. YUM!

1½ cup Dried apricots
1½ cup Water
6 tablespoons Sugar
1 can Crushed pineapple (8 oz)
1½ tablespoon Cornstarch
Salt
3 tablespoons Butter

Pastry for 8" double pie crust

Put apricots in saucepan, add water, bring to boil, cover and cook over medium heat 10 minutes. Add sugar and cook 5 minutes more. Drain, reserving 3/4 cup juice. Set apricots aside. Drain crushed pineapple, reserving 1/4 cup juice. Set pineapple aside. In mixing bowl, dissolve cornstarch in reserved pineapple juice. Add reserved apricot juice. Put mixed juices in saucepan, add dash salt and cook over medium heat until mixture thickens, stirring continually. Mix drained apricots and pineapple thoroughly. Mix with thickened juices and pour into unbaked pie shell. Dot with butter. Cover with top crust, crimp edges and pierce with fork. Bake at 400'F. 25 minutes. Makes 6-8 servings

Monday, August 30, 2010

Cucumber Sandwiches


It appears that only thing our garden can produce are cucumbers, snakes, and weeds. Which obviously thrills me to pieces (sarcasm). Regardless, we've had a bumper crop of cucumbers and will have lots of butternut squash when we harvest them in the fall. Presently I have more cucumbers than I know what to do with. Lance likes his cucumbers two ways: sliced and made into cucumber sandwiches. (Secret: I think that cucumber sandwiches are a little girly. They exude a tea party sort of "prim and proper" attitude. But let's not share my sentiments with Lance who already gets teased at work when he takes big salads for lunch.) Anyway, cucumber sandwiches. They are quite tasty with the correct seasonings. My coworker, Jean, makes her cucumber sandwiches like this and Lance and I love them.
1 pkg of cream cheese, softened
1 pkg of Good Seasons Dry Italian Dressing Mix
Rye cocktail bread
Sliced cucumbers
Dried dill
Mix the cream cheese and the Italian dressing mix together. Spread on rye cocktail bread, top with a sliced cucumber and sprinkle dried dill on top. Enjoy!

Wednesday, August 25, 2010

Veggie Pizza Appetizer


One world. Yum. I love, love, love this veggie pizza. I'm not positive that it's super healthy - it does have cream cheese and crescent rolls for a crust, but I love veggie pizza. We have it quite a bit at work - monthly at least - and I always get a couple of pieces. 'Cause ya know ... too many veggies never killed a person! I was able to do a little crisper drawer cleanup and use some leftover veggies for the toppings. Typically it doesn't call for all of the veggies I used, but you can tailor this dish to your taste. If it were up to Lance, he would tailor this dish to include no vegetables and pepperoni. Not really the point ...

Appetizer Veggie Pizza (Pillsbury)
2 cans crescent dinner rolls
1 package (8 oz) cream cheese, softened
1/2 cup sour cream
1/2 a packet of Hidden Valley Ranch dressing mix
shredded cheddar cheese
green onion
green pepper
cauliflower
small fresh broccoli florets
quartered cucumber slices
Roma tomato, seeded, chopped
shredded carrot

DIRECTIONS
1. Heat oven to 375°F.
2. If using crescent rolls: Unroll both cans of dough; separate dough into 4 long rectangles. In ungreased 15x10x1-inch pan, place dough; press in bottom and up sides to form crust. If using dough sheets: Unroll both cans of dough. In ungreased 15x10x1-inch pan, place dough; press in bottom and up sides to form crust.
3. Bake 13 to 17 minutes or until golden brown. Cool completely, about 30 minutes.
4. In small bowl, mix cream cheese, sour cream, and ranch packet until smooth. Spread over crust. Top with vegetables. Serve immediately, or cover and refrigerate 1 to 2 hours before serving. Cut into 8 rows by 4 rows.

Monday, August 16, 2010

Yum. Cheesecake.

Oh dear me. If cheesecake wasn't so high in fat and calories, I could eat it every single day. Have you seen the episode of Friends where Chandler and Rachel eat cheesecake off the hallway floor because it's so wonderful? I share those sentiments with Chandler and Rachel. This is one of my favorite episodes!


It's so wonderful. But don't try and fool me into eating one of those crap-no-bake cheesecakes. I know the difference. And it's not good. Every year, around July 30, the Cheesecake Factory celebrates their anniversary with specially priced cheesecake. Last year we were in route to MI when the celebration rolled around. I tried to incorporate a Cheesecake Factory stop into our trip, but it would have been something like 2.5 hours out of our way and Lance wouldn't have it. So last year I had to miss out. But this year I got my cheesecake. Yes, I had a wedding rehearsal that I was helping with until 8 pm, but I would not be deterred. We went at 9 pm instead :) That's dedication.

My favorite kind is White Chocolate Raspberry. Hands down, wonderful. See my delight? What is your favorite? My coworker said she was going to get plain cheesecake. I think that if you are going to Cheesecake Factory, you cannot get plain. That's just wrong.


Lance went with the gooey Snickers cheesecake. I still prefer mine.


Look how pretty that pink swirl is? I could eat tons of this. It is so good.


I wonder if I could recreate ... I probably could. Here's one copycat recipe I found here. I'm not sure if I am ambitious enough to try and replicate perfection.

Ingredients
Crust
1 1/2 cups chocolate cookie crumbs or 20 crumbled Oreo cookies (filling removed)
1/3 cup margarine, melted

Filling
1/2 cup raspberry preserves
1/4 cup water
4 8-ounce pkgs. cream cheese
1 1/4 cups granulated sugar
1/2 cup sour cream
2 teaspoons vanilla extract
5 eggs
4 ounces white chocolate, chopped into chunks

Optional Garnish
2 ounces shaved white chocolate
whipped cream

1. Preheat oven to 475 degrees. Place a large pan or oven-safe skillet filled with about 1/2-inch of water into the oven while it preheats. This will be your water bath.

2. Combine the raspberry preserves with 1/4 cup water in a medium microwave-safe bowl. Heat for 1 1/2 minutes on high in your microwave. Stir until smooth. Strain to remove the raspberry seeds (toss 'em out), then let the strained preserves sit to cool, then put the bowl in the refrigerator until later.

3. Measure 1 1/2 cups chocolate cookie crumbs (or crush 20 Oreo cookie wafers -- with the filling scraped out -- in a resealable plastic bag) into a medium bowl. Mix in 1/3 cup melted margarine. Press the crumb into a 9-inch spring form pan that has been lined on the bottom and side with parchment paper. Use the bottom of a drinking glass to press the crumb mixture flat into the bottom of the pan and about 2/3 the way up the side. Wrap a large piece of foil around the bottom of the pan to keep the cheesecake in the water bath. Put the crust in your freezer until the filling is done.

4. Use an electric mixer to combine the cream cheese with the sugar, sour cream, and vanilla. Mix for a couple minutes or until the ingredients are smooth and creamy. Be sure to scrape down the sides of the bowl. Whisk the eggs in a medium bowl and then add them to the cream cheese mixture. Blend the mixture just enough to integrate the eggs.

5. Remove the crust from the freezer and sprinkle 4 ounces of white chocolate chunks onto the bottom of the crust. Pour half of the cream cheese filling into the crust. Drizzle the raspberry preserves over the entire surface of the filling. Use a butter knife to swirl the raspberry into the cream cheese. Just a couple passes is fine, you don't want to blend the raspberry and cream cheese together too much. Pour the other half of the filling into the crust.

6. Carefully place the cheesecake into the water bath in the oven. Bake for 12 minutes at 475 degrees, then turn the oven down to 350 degrees and bake for 50 to 60 minutes or until the top of the cheesecake turns a light brown or tan color. Remove the cheesecake from the oven to cool. When the cheesecake is cool, use the foil from the bottom to cover the cheesecake and chill it in the refrigerator for at least 4 hours.

7. Before serving, sprinkle the entire top surface of cheesecake with 2 ounces of shaved white chocolate. To serve, slice the cheesecake into 12 equal portions. Apply a pile of canned whipped cream to the top of each slice and serve.

Makes 12 servings.

Tuesday, July 20, 2010

Tofu is fun-fu


Tofu is fun-fu. Haha, I made a funny.
This is a meal that I had about a month ago. I was pretty darn impressed with myself. I marinated and baked the tofu and then served it with brown rice and steamed sugar snap peas and broccoli. It wasn't really a Lance meal, but he survived because ... the tofu was really yummy! Granted, I still have not achieved a lovely crispy texture, but the tofu was really tasty. I recommend giving tofu a second chance. You might be surprised.

Make sure you press your tofu really well. I mean excessively well. I drained and wrapped my tofu in multiple dish towels prior to going to work in the morning and then took it out of the fridge when I got home and marinated it then. Pressing your tofu helps decrease the nasty sogginess that so many people dislike.

The marinade was pretty simple - just a lot of tasting and dumping, but not a lot of measuring ... soy sauce, honey, garlic powder, minced ginger, sesame oil - voila!

Cube your tofu, lay it out on a foil lined, sprayed baking sheet and bake for 20 minutes at 375 degrees.

Then I used the extra marinade and drizzled a little bit of it over the brown rice and the veggies. It was very yummy and very healthy. Have you tried tofu yet? Give it a spin - it will help your waistline and your budget.