Wednesday, April 27, 2011

Homemade lemon bars

Do you know that I've never made lemon bars not out of a box mix before? I know, a little shameful. Not as shameful as ... being a bandwagon Iowa fan or something else equally ridiculous :)


I knew I needed to make these lemon bars after a stunning write-up in the USA Weekend a few Sundays ago. I knew they would be a fun spring addition to our Swap Party munchies. They were everything a lemon bar should be - sweet, tart, a little tangy with a rich buttery shortbread crust. I've previously enjoyed Krusteaz Lemon Bars Mixes, but of course the homemade version far surpasses the box mix. If you are feeling the itch for lemon bars - this is your recipe. It wasn't too hard either, Lance and I assembled these at 9:30 pm with little difficulty. However, I did have a moment of panic when I didn't think the lemon filling was setting up properly because I failed to measure out the lemon juice when I was juicing the lemons. But all's well that ends well and the bars were perfection! One thing to keep in mind - this does not make a huge recipe.

Recipe by Three Many Cooks

For crust:
1 cup all-purpose flour
1/8 tsp salt
½ cup confectioner's sugar
1 stick (8 Tbs.) butter, melted but not hot

For filling:
2 large eggs
¾ cup sugar
1½ Tbs. all-purpose flour
6 Tbs. juice from 2 lemons
2 tsps. finely grated lemon zest

Adjust oven rack to lower-middle position and heat oven to 325 degrees. Spray an 8- by 8-inch baking pan with vegetable cooking spray. Fit an 8-inch by 16-inch piece of heavy-duty foil across pan bottom and up the 2 sides as foil overhangs to pull bars from the pan. Spray foil with vegetable cooking spray.
Mix flour, salt, confectioner's sugar in a medium bowl; stir in butter to form dough. Press dough into pan bottom (the bottom of a measuring cup dipped in flour helps). Bake until pale golden, about 20 minutes.
While pastry bakes, whisk eggs, sugar, flour, lemon juice and zest in a medium bowl.
Remove pan from oven. Add lemon mixture and continue to bake until just set, about 20 minutes longer; let cool in pan for a few minutes and then using foil handles, pull bars from pan and set on a wire rack. Cool until room temperature. Cut into squares and serve.

Friday, April 22, 2011

Swap Party

Photobucket">

A couple weeks back my friend Nicole and I co-hosted a swap party together. Nicole was the perfect co-host as she has a beautiful home and is probably one of the few people who is more organized than I am! (side note: it would be a fallacy to say that I'm not an organized being; however, I have a husband who is the exact opposite of me. The concept that everything has a home and should be put back in it's respective home is a foreign concept to dear husband. But he's thoughtful and God knew what he was doing when he brought us together. We're a good yin/yang balance. That being said, don't ever come over to my house unannounced and expect tidiness!) Anyway, Nicole does a great job of balancing being an English teacher at two colleges, being a freelance editor, and making time for her husband, energetic 4-year old son and their Boston Terrier. And of course being a very talented blogger with an eye for the aesthetic.

It was a lot of fun and something new for our friends. The swap party idea was something that I had seen floating around the internet and in several blogs. I had been kicking it around in my head for months and it took partnering with Nicole to finally bring the party to fruition. She's good at the details. I knew that all of us would have at least one item to swap, but I thought it would be an even better reason for everyone to get together without any of us spending a lot of money. The trickiest part of the whole thing was probably convincing people their stuff was good enough for the swap - many of our friends thought their stuff was too trashy. None of us are Kennedys or Rockafellers, so I don't think anyone expected any of the items to be of large scale grandeur :)

Nicole and I organized the swap into three catagories: clothing/accessories, home furnishings, and kitchen items. Originally we had told people 5 items per person, but as we started getting mixed feedback about the number of items people were bringing we decided to not limit the items. We also had originally requested that people try and get their things to us ahead of time. This was causing some difficulties for people, so we allowed everyone to bring their things with them prior to the swap. I think that if we would have had a huge number of participants or items, this choice might have been a little chaotic, but it worked for our party. Any unswapped items at the evenings end could be left in a tote by the door for Goodwill or could be reclaimed by the owner.

We initially sent a save the date email about one month prior to the party and then sent an official Paperless Post email invitation about 10 days before the actual party. We followed Real Simple's suggestions for hosting a swap party and I think it worked pretty well. Everyone drew numbers as to the order in which they got to pick their items. This number correlated with the number of items they brought to swap. For example, if you brought five items, you got to draw five numbers, thus getting to take home five items with you. Some wives were given strict instruction from their husbands if there were any flat screen televisions or Blueray players, to make sure they got those items first. Husbands are silly :)

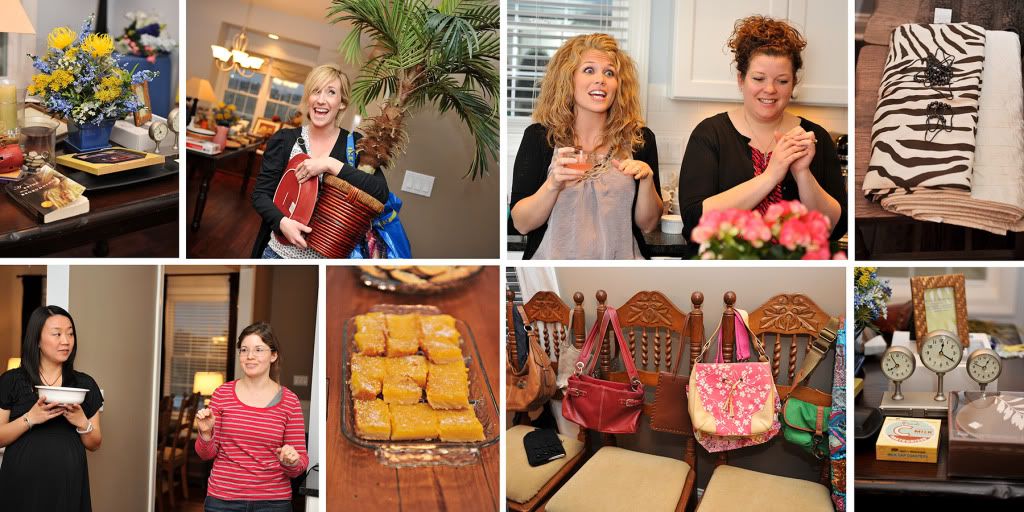
Nicole and I also provided munchies: Mint Milano cookies, Jelly Belly jelly beans, mixed nuts, pita chips, chocolates. Nicole made some yummy raspberry shortbread bars and I made classic chocolate chip cookies and a new lemon bar recipe (I'll post the recipe for the lemon bars at a later time). We also provided decaf coffee with some fun creamers and pink lemonade. Nicole and I followed a black/white/pink party theme, so we had some pretty pink accents. Nicole's husband, Josh, said that it clearly was a girls party. Apparently pink is abhorrent to guys :)

All in all, it was a fun evening. We all stood around the kitchen mingling and chatting and seeing what each other picked. Household items proved to be the hot items of the evening - we had everything from huge potted plants, decorative bowls, to shower curtains. Clothes proved to be a little tricker. The party served as a great excuse for spring cleaning and I look forward to doing another swap party in the future, perhaps with different swap catagories. One woman's junk is another woman's treasure!

The photo collage is courtesy of Sarah Franczky, of Franczyk Photography

Tuesday, April 12, 2011

Be a yogie


I'm in my third trimester of my pregnancy. I'm feeling bulky and uncomfortable to say the least, but yoga has helped alleviate some of the traditional body awkwardness that comes with pregnancy.


One of the things that both my OB-GYN and my chiropractor have agreed upon is my continued practice of yoga. In my first trimester I experienced some lower back pain associated with pregnancy. Yoga has helped relieve some of this pain and has helped me learn how to stretch some of the muscles that have limited mobility. Another benefit of yoga is the regular practice and focus on breathing techniques. I'm sure this too will come in handy in the future. While there are some poses that I'm not able to do anymore, I can feel a difference in my body and my energy levels when I'm not doing yoga regularly. I feel sluggish, my muscles feel tight, and overall I feel somewhat unbalanced.


I'm thankful that I'm given the opportunity to do yoga at work during lunch twice a week. It's a great chance to take a break from my cubicle and spend a little time stretching and getting recentered. Our yoga instructor, Emily, is fantastic and makes sure to include different variations of the poses for people at all levels. So if you are thinking about starting yoga or are looking for something else to add to your workout, yoga is the place for you.


One of the many benefits to yoga is the engagement of core muscles that might otherwise get ignored. If you are a runner, you can benefit from the practice of yoga as yoga utilizes smaller muscle groups that don't regularly used. For example, my husband, a seasoned runner, had encountered chronic knee pain that have sent him to a physical therapist. The physical therapist's diagnosis? Under- developed IT bands. The physical therapist gave him several stretches and strengthening exercises to do, things that I was already doing in yoga! Yoga can be the perfect complimentary exercise that you might not think you need, but your body knows it needs.


I often hear people say they can't do yoga because they aren't flexible. This statement, to me, seems like an easy excuse. Just like with any technique or skill, no one started at day one as an expert. People can't hop out of bed and decide they're going to a star-Olympic athlete without a little work. To be able to do anything well takes consistency, perseverance and practice. I'm sure on that first day of yoga, you will feel a little awkward. But with a little time and patience, practice makes perfect!


This is a prenatal yoga video I've also done to supplement my classes. It would be a great starting point for the new-to-yoga and the mother-to-be.


Monday, April 11, 2011

Pregnancy photos

Funny story. Here I thought that it was my idea to have a couple of pregnancy photos taken my my talented friend and photographer, Sarah, when in actuality, I was tricked by my friends into having these taken for my baby shower invitation! Regardless of whose idea it was, the photos will be a precious memory in the development of Baby K. I can't wait to have Sarah do a newborn session with our little guy so we can savor those memories too.


Wednesday, April 6, 2011

I make the best oatmeal raisin cookies on the face of the earth.


Yes, it might be boisterious of me to say that I make the best oatmeal raisin cookies, but gosh golly, it's true. I really do make the best oatmeal raisin cookies on the face of the earth. I don't make them often because in the words of Phobe Buffay from the acclaimed comedy Friends "it's not fair to the other cookies." Please disregard the fact that according to this picture, it looks like there are zero raisins in the actual cookies ...

The thing that makes these particular cookies so special is their texture. An oatmeal cookie should not be overly crunchy, nor should be it overly soft and doughy. No pillow cookies here. An oatmeal cookie needs slightly crunchy, but not break your teeth crunchy. These cookies are perfect. They are the perfect Martha Stewart cookies (they really are Martha cookies - they are her recipe!) Like many Martha recipes, there is a fussy and long list of ingredients. No cheating, every single ingredient on this list is important. Lance and my dad adore these Oatmeal Raisin cookies. They will both attest to the lovliness of them.

Without further ado, here's the recipe to Martha Stewart's perfect Oatmeal Raisin Cookies

Ingredients

3 cups old-fashioned rolled oats

1 cup all-purpose flour

2 tablespoons all-purpose flour

1/2 cup toasted wheat germ

1 teaspoon baking soda 1 teaspoon baking powder

1/2 teaspoon ground cinnamon

1/2 teaspoon coarse salt

1 cup (2 sticks) unsalted butter, softened

1 cup granulated sugar

1 cup packed light-brown sugar

2 large eggs

1 teaspoon pure vanilla extract

1 1/2 cups raisins


Directions

1.Preheat oven to 350 degrees. Stir together oats, flour, wheat germ, baking soda, baking powder, cinnamon, and salt in a large bowl; set aside. Put butter and sugars in the bowl of an electric mixer fitted with the paddle attachment. Mix on medium speed until pale and fluffy, about 5 minutes. Mix in eggs and vanilla. Reduce speed to low. Add oat mixture; mix until just combined. Mix in raisins.

2.Using a 1 1/2-inch ice cream scoop, drop dough onto baking sheets lined with parchment paper, spacing 2 inches apart. Flatten slightly.

3.Bake until golden and just set, about 14 minutes. Let cool on sheets on wire racks 5 minutes. Transfer cookies to racks using a spatula; let cool completely. Cookies can be stored in airtight containers at room temperature up to 3 days

Saturday, April 2, 2011

Nesting that includes sewing

Each pregnancy is different for each woman. Apparently my nesting instincts also include a desire to sew. And I've been sewing up a storm - Kara version of sewing up a storm. Mostly this includes straight line sewing with no patterns to speak of (because I can't follow or translate a pattern to save my life). I've lopped off the sleeves to 2 night shirts and 2 dresses (full length sleeves transformed into 3/4 length sleeves) and taken up the hem of one dress along with taking the dress in about 4 inches (which perfectly illustrates the point that I really had no idea of how to purchase maternity clothes that fit correctly).

  • Now I'm moving onto baby items. I've already made one taggie blanket based on this tutorial and some sage advice from my mom. My original intention was to make just one blanket, but along with my inability to follow a pattern, it has also come to light that I have no idea how fabric is actually in a yard. So ... now I've been given the opportunity to make multiple blankets!

  • I've also purchased some cloth diapers and some fabric and some quilt binding to make some cutie burp cloths. I'm not really working from a pattern. We'll see how that one goes :)

  • I also think these onesies are adorable. I'm registered for some plain ones, so if I'm gifted those, it will be the perfect opportunity to add these animals as a decoration.

  • This isn't a baby item, but I'm recovering a pillow that is on our couch in a material that is more contemporary. Again, given my lack of understanding of how much material a yard encompasses, I might have enough leftover fabric to sew a new valance for the kitchen window too!

  • I would like to sew my own Boppy pillow cover. However, it requires me to follow this pattern. We will see if I'm able to make head's or tails of it. Maybe I'll enlist Lance's help. Pattern reading is much more his style and less of mine.

  • I'm not particularly enthralled by the crib skirt that came with the rest of the bedding. I'm thinking about sewing one that better suits my fancy, but again, I'm plagued with the planning stage of it. My friend Nicole, author of this fantastic blog, wrote a very detailed, instructional post about how to sew a table skirt. It was so detailed that it made my head whirl a little bit. Maybe I can con her into helping me with the planning portion of the bed skirt. I'm confident enough that I could do the physical sewing part, it's the planning portion and measuring portion that might kill me :)

  • And while we're on the topic of skirted tables, I do happen to own a round table that could use a different skirt on it for the nursery. But I think it's lower on the list of sewing priorities.

People have told me that the nursery doesn't have to be done when the baby arrives. I'm choosing to ignore these people. It's just not me to put something like this on the back burner.

I think this alphabet art project would be perfect for the nursery. Add something else to my list. At least there is minimal sewing involved!

This is also another project that I'm interested in doing for the nursery (I know, I think I have some disease that is making me slightly project crazy. Although well-intentioned people might tell me that disease is called pregnancy). I actually would put this project off until the baby arrives, so I could design this with the baby's birth details.